 Gil’s Garage
Gil Baumgartner
CTCI Authenticity Chairman
Thunderbird parts dealers have developed a mechanical brake lamp switch designed special for the 1955-1957. This switch mechanism promises to be more responsive as well as provide an extended life.


This article is not intended to replace the written instructions provided with the switch. It is intended to answer questions that have been generated by the occasional weekend mechanic.
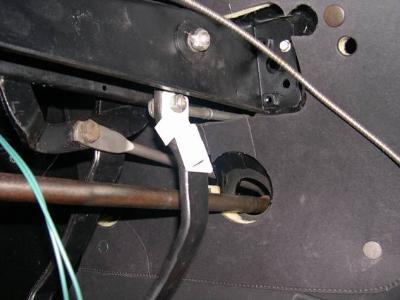
- The switch mechanism does not require drilling of additional holes.
- The mechanical portion has two parts plus the switch and wiring.
- The switch release actuator has been painted white in these pictures for contrast.
- The white switch actuator pictured is installed under the eccentric bolt (P/N 2462) for the brake pedal push rod (P/N 2143) to master cylinder.
- The eccentric bolt head requires a 3/4″open or box end wrench. The bolt head is difficult to access because of the steering column tube especially on stick shift cars. The ideal time to install the mechanical switch is during a restoration when the steering column tube is removed (pictured). The nut is on the outboard side toward the center of the car and is easy to remove with a 9/16″ wrench. The large shank of the bolt has two plastic inserts (P/N 2454) that must be reinstalled if removed or missing.
- The larger portion is the switch mount mechanism and is painted black in this picture. It is installed in an existing hole in the under-dash brake and clutch mount bracket P/N 01508.
Once the mechanism is installed the switch is easy to adjust in or out for proper operation. Switches provided in the kit may vary in appearance.
The original stop light switch may be left in place or removed and plugged.
Gil Baumgartner